Tuesday 28 August 2018

FRUIT CUP WITH DARK SUGAR GLAZE, vegan opt

Taking advantage of soft fruits at their British best...
Molasses Sugar Fruit Cup, a layered healthful beauty
Layers of soft fruit - now in abundance, at their best and lower in price - topped with yoghurt and sprinkled with dark sugar are gorgeously displayed in drinking glasses*. 

Berries are not only beautiful, they are also tasty and good for you. They are the least sweet of fruits and the most nutritionally valuable.  Black Molasses sugar is the closest of sugars to the natural state of sugar beets and full of vitamins and minerals.  (Billingtons available at most supermarkets, produce unrefined sugars including molasses sugar that is non-gmo, gluten-free and vegan.

67 used a variety of soft fruits in the photo: nectarines, cherries, strawberries, blueberries, kiwi fruit,  'cause that's what was in the fridge.  But a single berry or soft fruit, or even a single or variety of less pricy fruits like apples, oranges, bananas, pears will be perfectly fine.  (If using the less pricy fruits, best stir in a generous pinch of cinnamon or ginger to the fruit before topping with yoghurt.)

The fruit cups make a simple thrown-together dessert with a dark, smoky layer of sweetness.  For breakfast, top each fruit layer with uber-granola.  

This is best made on the night before or refrigerated at least a couple of hours. 
1st posted 6/8/16 
Cost: as little or as much as you like
Feeds: 1 or more  

Ingred:
   whole berries OR
   peeled, cut up fruit OR
   both
   
   2-3 generous tbsp strained 0%-fat plain yoghurt per serving 
   a drop or two of vanilla extract (opt)
   1 1/2-2 generous teaspoons molasses sugar per serving

Method:
  1. In a separate container, mix yoghurt & vanilla
  2. Place fruit, layered or in a heap, in see-though glasses or small bowls  
  3. Cover with yoghurt
  4. Sprinkle with molasses sugar or other brown sugar
  5. Refrigerate overnight 
Tips:
  • defrosted frozen fruit was also used and worked well; the juices added to the layers of flavour
  • if the budget doesn't run to Molasses Sugar (which appears in other 67 recipes) use the darkest brown sugar you have
*Balloon glasses: 4 for £4, Morrisons 


Please leave a Comment in the box below

This recipe has been developed by B  Lee/ Bright Sun Enterprises and may not be reproduced, in any form, without the author's written permission.  

EASY MAIN: ORANGE GLAZED SALMON.

Flavourful gently exotic dish just sweet enough for the entire family; ever-so-quick & won't break the bank (unless you want it to)
first posted March 2018
Salmon Fillets with a Hoisin Orange Glaze: 'supremely simple yet sensational' 

This is a glorious recipe for salmon fillets, even frozen ones: an unusual (in a good way) smoky, fruity glaze keeps the flesh succulent and tender.  It can be surprisingly wallet-friendly.  

Salmon from big health food stores* and upmarket supermarkets are eye-wateringly expensive but the taste and texture are superb.  As they should be.  If you've deep pockets, these are the ones to go for.

For everyone else, frozen wild salmon is by no means an inferior alternative.  Two small fillets and two good-sized sized tail portions come in at £4.60 at UK's favourite frozen food shop**.  They can be cooked from frozen but 67 finds defrosting, rinsing and drying the fillets gives a better result.

The glaze is simple but appealing: fresh orange & hoisin sauce. The sweet oranges appeal particularly to kids' palates.  If the cupboard doesn't run to Hoisin - an excellent sauce which has appeared in several 67 recipes this year - replace it with easy-peasy home-made sweet chilli sauce.  

Never overcook fish; these fillets will be ready in 10-12 minutes.  Check by inserting the point of a knife into the thickest part of the fish; the fish should flake nicely.  A bit of pink is fine; the fish will carry on cooking out of the oven.  Cover with foil and rest 10 mins before serving; 


Cost: min £5
Feeds: 4

Ingred:
   4 salmon fillets, defrosted or fresh
   2 tbsp Hoisin sauce (Chinatowns and some supermarkets***)
   1 large orange: zested coarsely then peeled and sliced thickly
   pepper & salt

Method:

  1. If using frozen fish, defrost fillets overnight; rinse, blot with a paper towel
  2. Preheat oven to 180c/350f; place a deep tray or ovenproof glass container filled with 2in/4cm water in the bottom of the oven (to stop the fish from drying out)
  3. Season fish lightly with pepper & salt
  4. Mix Hoisin & orange zest; brush fillets with hoisin mix; place orange slice on each one 
  5. Lay fillets in in a low sided glass dish (or a metal baking tray lined with greaseproof paper)
  6. Bake 10-12 mins; brushing once with hoisin and orange after 5 mins
  7. Remove from oven; cover with foil, rest 10 mins
  8. Serve with extra sauce on the side, unfried rice, steamed rice or boiled baby potatoes plus a salad or quick cooking green veg like tenderstem broccoli, green beans, shredded sprouts cooked in boiling water 3 mins or until done to your liking
Comments:
'So easy to put together and absolutely sensational to eat.  Didn't mind at all that the fish was frozen.'  Retired writer

Tips:
  • use easy-cook white supermarket rice for unfried rice, following the packet instructions
*Whole Foods
**Iceland
***Chinese supermarkets: brand Lee Kum Lee

Please make a comment in the box below

This recipe has been developed by B  Lee/ Bright Sun Enterprises and may not be reproduced without the author's written permission

FEISTY AUTUMN SALAD, Vegan, budget friendly, easy

Loads of vegetables and plant protein in a satisfying salad...
Spinach, Pulse & Vegetable Salad, Vegan
'Filling and refreshing; perfect for autumn' Taster
Salads always seem a little insubstantial as summer winds down, even if they offer strong nutritional and digestive value. 

Which is a shame because using spinach instead of lettuce and adding pulses to traditional salad ingredients do a good job of meeting the body's needs as the weather cools.  If heat is needed, add a mug of soup/broth, a piping hot baked potato or toast.  

This is a budget friendly dish that can cost as little or as much as you like, depending on your fridge or your wallet.  It's also very easy to prepare.  


if veg are not organic, soak in a solution of 9 parts water, 1 part vinegar for 20mins, drain & rinse
first posted Oct/17

Cost: depends on what's in your fridge but not likely to break the bank!
Feeds: 1 or many, again depending on what's in your fridge/cupboard

Ingred:
   generous handful spinach leaves, washed, drained, stems removed
   sliced cucumber
   coarsely grated carrot
   sliced tomatoes, sprayed lightly with olive oil and salted lightly
   quarter-half avocado, peeled & sliced, with lemon juice squeezed over and seasoned with pepper & salt
   kidney beans, washed and drained (generous handful or a few tablespoons, depending on requirements)
   raw mushrooms, med sliced (opt)
   sunflower seeds
Optional: 
   any other seeds and nuts: pumpkin seeds, walnuts, almonds 
   cooked leftover veg like broccoli, green beans, cauliflower, mange tout, shredded sprouts 

Method:

Tuesday 21 August 2018

CHERRY GARCIA CREAM PIE, No-Bake Indulgence, Not Healthy, contains alcohol

A special occasion pie to celebrate long summer holidays...
Glorious studded Cherry Chocolate Cream Pie on a crunchy biscuit base
'Everyone who managed to get a piece loved it.' 'Beautiful! Could easily have got carried away.' 'Very, very nice and not at all sickly',

August is so glorious; garden parties and fetes abound.  Barbecues perfume the air with charred roasting meat; gingham covered tables groan with salads and a myriad of treats.  

67's contribution this year was Cherry Garcia Cream Pie, choc-a-block with chunks of fresh cherry and dark chocolate, elevated with the addition of cherry brandy.  The contrast of deep pink, white fluffy mounds of cream and accents of chocolate bits is so attractive.  The pie proved rather a  crowd-pleaser.  
  
Cherries are one of 67's favourite fruits.  They've been eaten unadorned, by the handful, and cooked in almond scented sponge.  

The deep dark fruits look and taste so good; the flesh is firm yet juicy and - best of all - is linked to good heart health.  The antioxidants in the red colour can ease inflammation, lower cholesterol and cut belly fat.  (Though clearly not when buried in cream on crunchy buttered crumbs!)

Cherry Garcia Pie is truly indulgent but making a few small changes (see recipe) can lower fat-levels.  A bit.  And only if you really want to.

The pie is not frugal but it is a special occasion indulgence.  It will serve 12 decent slices.  If you want to make it go further,  layer the crumbs and cherry-chocolate cream in a big bowl or rectangular pan, slather some cream on top, dot all over with fresh cherries and shards of chocolate and stick a decent-sized but not large serving spoon in it.  Provide small serving bowls and, if you like, a large dish of double cream whipped with a bit of sugar and vanilla.

There are a few simple stages to get through but part of it can be made in advance.

A simpler version, which has less intense flavour, is in Tips, below.

Cost: £8-9'ish
Serves: 12

Ingred:

   1.5-2 cups pitted fresh cherries
   1/4-1/2 cup sugar
   2-3 tbsp cherry brandy (or fresh orange juice & finely grated zest)

   13-15 digestive biscuits 
   90 g unsalted butter, melted

   300gm/10.5 oz full-fat or 80% fat cream cheese at room temperature
     75gm/2.6oz white baking chocolate* (white chocolate bars will not do)
   1 pint double or (lower calorie) whipping cream
   1 tsp vanilla

   75gm/2.6gm plain dark chocolate, cut into small chunks or shards

Garnish:
    150gm/6oz whipping cream (or a 60-40 mix of whipping cream & 0-fat strained plain Greek or Icelandic yoghurt)
    2 tbsp icing sugar

    a few fresh cherries, pref with stems
    1-2 squares dark chocolate, in shards or small dice

Method:
  1. Place biscuits in a heavy plastic bag and bash enthusiastically with a rolling pin; you're looking for a crunchy base without large lumps of biscuit.  (For a smoother base, whiz the biscuits in a food processor until sandy)
  2. Melt butter in the microwave or in a small pan; mix with crumbs; pour into a 9inch/23cm loose sided pan or equiv. Use the bottom of a measuring cup to even out the crumbs.  Refrigerate
  3. If cherries are not organic, swish in a solution of 9 parts water and 1 part vinegar; drain and rinse.  Set aside 10-12 cherries with nice stalks for garnish.  
  4. De-stem the rest of the cherries.  If you don't have a cherry stoner (available on the net); cut off the fat sides (like prepping a mango) then the bits around the stones;  chop the flesh coarsely.  Pour over brandy or orange juice, cover & refrigerate.  Steps 1-4 can be completed the night before
  5. Heat a large frying pan over med-high heat; add a dollop of butter and the   cherries.  Check for pits which might have have crept into the fruit. 
  6. Bring to the boil; reduce heat to med-low; stir in sugar and liquid; cook gently, stirring occasionally until the juices thicken - probably 5 mins.  If the cherry mix has got too sticky too fast, add a tablespoon or so of water.
  7. Take fruit off heat; pour into a processor or high sided bowl, scraping all the juices in; blitz until smooth (a stick blender will be fine); allow to cool
  8. Bring a small pot of water to the boil; break up the white baker's chocolate into smaller chunks.  Reduce heat to a simmer, sit a heat-proof bowl on top of the pot, put the chocolate in the bowl; stir once or twice as it melts - it will take a few mins.  As soon as it has melted, take it off the heat
  9. In a large bowl, beat cream cheese until smooth with electric beater or whisk; add melted chocolate while it is still warm and liquid but not hot; blend thoroughly  
  10. Add cherry mix; blend 
  11. Pour in the pint of cream all at once.  Starting slowly, gradually beat the cream cheese, white chocolate, cherries and cream until mixture thickens and med-soft peaks form.  Don't overbeat -- it will turn into butter.
  12. Using a hand held whisk or spatula, stir in shards of dark chocolate, distributing evenly 
  13. Pour onto biscuit base, spreading it evenly out to the edges
  14. Refrigerate at least 4 hours
Garnish: beat whipping cream to soft peaks, add icing sugar; carry on whipping, watching carefully, until firm peaks form.  Either dollop or pipe mounds onto the pie's edges, decorate with fresh cherries and chocolate chunks 

Comments: 
  • 'I really loved it; the brandy, cherries and cream all went really well together; the biscuit was very light.  I could have had more than one slice.' Local butcher
  • ' I'm a big cherry fan and this was very very nice.  It was not sickly; other cream pies are so often 'bleaugh'!' 
  • 'Alas my concealed stash of Cherry Garcia pie had been discovered by persons unknown so I never did get to taste it - but everyone said it was delicious!' Garden Party/Fete organiser  

Tips: 
  • Simpler version: skip steps 5-7 and simply mix fresh cherries & juices directly into the cream cheese mix.  The flavour will be less intense but still delicious
  • Cherry Garcia is credited to the iconic American ice cream brand, Ben & Jerry's.  The combination of chunks of cherry & chocolate mixed through  ice cream was very popular
  • A crunchy base is less likely to go soggy if left overs are refrigerated overnight 
More indulgent desserts on NavBar/RecipesII:Desserts ...

PLEASE LEAVE A COMMENT IN THE BOX BELOW

This recipe has been developed by B  Lee/ Bright Sun Enterprises and may not be reproduced, in any form, without the author's written permission.

TUMMY CURE RICE & CHICKEN, low-fat, mild, versatile

Easy, mild, lovely chicken rice soothes after tummy troubles AND provides  a flavoursome main course ...
Chicken Rice: gentle comfort for the ailing AND gloriously savoury main course
(here with hoisin sauce) 
It's easy to go overboard with rich foods in the summer.  We in the UK still think summers will be short and sweet; outdoor dining is something to be indulged in - big time - whether in someone's home or dining out.  We pile on the barbecued meats and sample loads of tempting salads and creamy treats.

The prolonged heat wave, however, has weakening some immune systems.  A fair few are suffering from gastric flu or food poisoning, their bodies weakened from nausea but clamouring for solid nourishment. 

This recipe from 67goingon50 was created for just such an occasion.  Chicken Rice is wholesome and sustaining; its delicate flavours soothe and comfort a dicky stomach but also satisfy healthy appetites.  

Ailing cooks won't have to put in much effort for the dish; it pretty well cooks itself.  It can be served as it is but a trio of piquant sauces, served on the side, enlivens the dish for those who are strong and healthy.

For singletons, leftovers are easily portioned up and frozen.

Brown rice is best for this dish; the high fibre content is beneficial to the gut.

Cost: £5 to £10, depending on the chicken
Feeds: 4

Ingredients:
   1 cup brown rice
   2-3 cloves garlic, unpeeled
   2 x 1/4 inch slices fresh ginger, peeled

   1 whole chicken, the best you can afford, backbone removed & breast flattened OR 4 chicken quarters
   med onion, pref red but white will do, finely diced

   couple of handfuls small cauliflower florets
   generous handful green beans or mange toute, string removed

  Garnish: small dish each of
      reduced salt soy sauce
      oyster or hoisin sauce
      ginger-scallion sauce

Method:
  1. Place rice in a sieve over a biggish bowl; run cold water from the tap over it, making sure all the grains are wet.  (If the grains aren't wet, they will float to the top and down your drain. Not good.)  Let the water run over the rice until it runs clear, say 5 mins
  2. Add rice to a large pot with 2 cups water or stock and the diced onion; stir; place garlic & ginger on top
  3. Bring to the boil
  4. Remove skin from chicken 
  5. When water is boiling, turn heat down to med high, place chicken flesh side down on the rice -  it will begin to cook in the heat & steam from the rice
  6. Partially cover with a lid; allow rice to bubble gently until nearly all the water has gone and holes start appearing in the surface of the rice - it will take 15-20mins 

  7. Carefully flip chicken over; the flesh side will now be uppermost; scatter over cauliflower florets
  8. Cover with a lid lined with a clean tea towel - this helps grains remain separate.  Reduce heat to low
  9. After 10 mins, scatter over green beans, mangetout, broccoli or peas
  10. Cook until veg are al dente, 5-10 mins 
  11. Check the chicken; there should be no pink inside
  12. Place veg and chicken in a dish; cover & keep warm 
  13. Remove garlic and ginger from rice (they should be easy to find)
  14. Break up the chicken; serve alongside rice and vegetables
  15. Serve with sauces on the side.  
Comments:
'After a week with gastric something-or-other, I was weak and very empty.  I could prepare this in stages, resting in between.  The rice ended up beautifully moist and delicately flavoured with ginger, garlic and chicken.  Though really comforting and easy to digest, it wasn't in the least boring.  Definitely one for the 'ill and infirm.'  Retired writer 

More chicken on NavBar/RecipesI...

Please leave a comment in the box below

This recipe has  been developed by B M Lee/ Bright Sun Enterprises.  It may not be reproduced without the author's written permission.

SPICED LENTIL & VEGETABLE POTAGE, ill & infirm, frugal

A perfect cure for overindulgence & heatwave related indigestion...
Spicy Lentil Vegetable Soup: 
easily digested, delicious relief for stomach upsets 

Dal - that wonderful frugal and comforting Indian concoction of spiced lentils -  
was the inspiration for 67's Spiced Lentil & Vegetable Potage during gastric flu after bad eating habits during the heatwave. 

The soup is fragrant with spices but that's part of what makes it so comforting - it contains several  that either reduce indigestion, nausea & stomach cramps or help break down food and relieve constipation.*

Dal in its original state also comforts but 67's soup is extremely easy to get down and to digest.  It also satisfies those awful food cravings following a bout of illness.  

The soup easily transforms into a protein rich potage for the healthy.

Cost: £1'ish; recipe doubles easily
Makes: 3-4 servings

Ingred:
   150gm/5.2oz dried yellow lentils (organic gives best flavour but any will do) 
   1/2 tsp turmeric
   1/3 pint water
   couple of tablespoons washed brown or white rice
   med onion, peeled but left whole
   large carrot, peeled, top & tailed, left whole

  1/2 tsp veg oil
  1/2 tsp butter (or more veg oil)
  1 tsp grated fresh peeled ginger
  3/4 tsp mild chilli powder
  1/4 tsp dried coriander or 1/2 tsp fresh
  1/4 tsp garam masala
  1/4 tsp cumin

  3 med tomatoes (if not organic, soaked in 9 parts water, 1 part vinegar 20 mins), core removed and in small dice
  3/4 tsp grated or minced garlic
  1/4-1/2 tsp salt
  90mg good stock (granules or powder if not home-made)

  generous handful mushrooms in small dice
  generous handful peas, or green beans chopped small

  Garnish: chopped parsley (opt)

Method:

  1. Place lentils in a sieve over a large bowl; run cold water over the lentils until the water runs clear - it will take a couple of minutes
  2. Put lentils, rice, turmeric, onion, carrot & water into a heavy-bottomed saucepan; bring to the boil.  Turn heat to med-low; simmer 15-20 mins partly covered or until lentils are soft; remove onion & carrot & discard
  3. Just before the lentils are done, melt oil & butter in another pan over med heat; add spices; saute  2-3 mins, stirring occasionally
  4. Add tomatoes and garlic and cook another 3-4 mins, stirring so the garlic doesn't burn and become bitter
  5. Add tomato-spice mix to lentils, then salt; rinse out frying pan with a little water and add that, too; stir & simmer 5-7 mins
  6. Set aside some mushrooms for garnish
  7. Add stock, mushrooms and green beans to the lentils, bring back to the boil; turn off heat 
  8. Puree with stick (or stand-alone) blender until very smooth and velvety.  
  9. Garnish with chopped parsley


 Nav Bar: How to...Cook Clever with Pulses plus Recipes II/Soups

Please make a Comment

This recipe has been developed by B  Lee/ Bright Sun Enterprises and may not be reproduced without the author's written permission.

VEGAN CHERRY CHOCOLATE ICE CREAM, dairy-free, low-sugar, easy

This is the nicest, tastiest, healthiest ice cream; you won't believe there's no cream - just bananas...
Sensational creamy soft ice containing just cherries, banana & chocolate
'No-fat, utterly delicious AND healthy.  Unbelievable!'
This dessert is not just an excellent remedy for tummy troubles; it's also a sensational treat for all times.  It's stuffed with this year's crop of fat purple cherries and dark chocolate shards and is incredibly creamy and delightful. 

67 has been meaning for ages to test recipes for a cherry and banana soft ice cream which have been circulating on the net and this wonderful treat is the result.  

Bananas have creamy, easily digested flesh.  They're excellent at muting hunger pangs and helping to return the digestive system to order.  They're also naturally sweet so are perfect for low-sugar delights.  


If you ever thought you could't eat ice cream for health reasons, think again!

You'll be amazed how easy the recipe is BUT you do have to plan ahead.  The bananas and cherries have to be chopped frozen before you start.  


Cost: £2-£3, depending on choice of ingredients

Makes: 2-3 portions but recipe doubles easily

Ingred:


  2 small ripe but not black bananas, sliced and frozen

  1 cup pitted or chopped cherries, frozen (from fresh are best but supermarket frozen will be ok)
  splash fresh orange juice, milk or cream (opt).  OR cherry brandy/brandy/whiskey/chocolate based liquor (opt)
  1/2 tsp vanilla (opt)

  small handful fresh cherries

  50 gm dark chocolate, in shards
   
Method:
  1. Peel and slice  bananas, lay them out on a ridged tray, freeze
  2. Bag up and returned to freezer until ready to make the ice cream
  3. Remove stalks from 1 cup cherries; cut off the fat sides (like prepping a mango) then chop the flesh surrounding the pits in small pieces.
  4. Place the cherry pieces in a sealable freezer bag, making the layer as flat as you can by pressing out the bulges.
     
  5. Freeze flat and store.
  6. Making the ice cream: Prepare fresh cherries as in 3; set aside
  7. Put frozen banana slices, frozen cherries  and a slosh of milk, cream or orange juice in blender; process until all is fully combined.  It should look like soft-serve ice cream. (See tips below)
  8. Stir through fresh cherries and chopped chocolate distributing evenly for a rustic appearance; for something smoother, pulse until coarsely combined.  
Comments:
'This was a revelation.  I usually avoid ice cream because of the high fat and sugar content; this recipe manages to avoid all that.  I recommend this to all oldies, dieters and anyone wanting to eat healthily.  This will definitely be made again!'  Retired writer 
'It was absolutely brilliant - and totally  delicious!' Semi-retired consultant

Tips:

Tips:

  • If your blender isn't very powerful , you may need to stop the machine a couple of times to push down the mixture to move it along.  The time this takes will unfortunately encourage the ice cream to melt and it will have to be re-frozen after the cherries and chocolate are added.  67 uses a smoothie maker instead of an ageing and not very efficient blender.
  • the frugal can reduce the amount of 2nd stage fresh cherries and chocolate or not add them at all
  • Cherries can be replaced by any other berries and the chocolate, by nuts or dried fruit. 
More fruit desserts in Recipes II on NavBar

Please leave a comment in the Box below

This recipes has been developed by B M Lee/ Bright Sun Enterprises and  may not be reproduced without the author's written permission.

Tuesday 14 August 2018

AVOCADO HAM DEVILLED EGGS, vegetarian opt, lower-fat, wallet-friendly

These quirkily yummy devilled eggs have it all: intense creaminess, delicate heat and a sublime salty sweetness that's just 'Wow'...
Quirky - in a good way - eggs stuffed with avocado, air-dried ham & egg yolk

Devilled Eggs - a thing of the 1950's - has undergone a revival, not least because eggs are such an inexpensive protein, high protein and endlessly versatile when it comes to flavours. 

Here's another fresh take on the popular stuffed eggs: Avocado & Proscuitto (vegetarian option below). 

If you watch Food Network*, you've probably seen chef/model Katie Lee whizzing up a vegetarian Avocado Devilled Egg.  It inspired 67 to create something similar but more muscular.

Though ham or salt beef is perfectly fine for this recipe, 67 used Italian and Spanish prosciutto, which are healthier  (Notes below).  

Air-dried hams are pricey, though; they take years to mature.  However, a little goes a long way, and stockists like M&S do 25gm/1oz'ish Italian prosciutto and 35gm/generous 1oz Spanish serrano for just a pound. 

67 chose vertical stuffed eggs for a special occasion but the standard half eggs also work very well. 


Cost: £3'ish
Makes: 9 first courses; 18 canapes for a buffet

Ingredients:
   9 hard boiled eggs (see method below)

  3/4 medium ripe avocado
  1 tsp lemon zest
  2 tbsp lemon juice
  1/2 tsp salt
  1/2 tsp wholegrain mustard
  45gm/1.5oz air dried ham, finely diced
  1/2 tsp smoked paprika
  4-8 drops tabasco or hot sauce, depending on taste (67 used 4)
  1/4 tsp chilli flakes (opt)
  1 rounded tbsp good mayo
  1 rounded tbsp 0-fat thick plain Greek yoghurt
  pepper

  2-3 tbsp finely chopped celery
  2 tbsp finely chopped chives

  1-2 tbsp very hot water

Method:
  1. Tap eggs top and bottom on a hard surface then push down firmly on the egg and roll it to crack the shell.  Peel the shell away; dipping in a bowl of water can make the peel release easier 
  2. Whether making the vertical stuffed eggs
    or the classic half-egg, slice a tiny bit off the bottoms so that the egg sits level and doesn't roll around.  With the vertical egg, the smaller pointier bit is the bottom.  You'll also have to slice off the top of the egg to get to the yolk.
  3. Place the yolks in a med bowl.  If making the vertical version, you may need to - carefully - dig out the yolk with a small pointed knife
  4. Add avocado, lemon zest & juice, 2/3 of the ham, salt, smoked paprika, tabasco, chilli flakes, yoghurt & mayo.  Blend; add hot water; blend again
  5. Stir through rest of ham, celery and chives
  6. Scoop into a piping bag or plastic sandwich bag with a large tip of your choosing or no tip at all.  Pipe or spoon filling into the egg whites. 
  7. If serving vertically, place tops at an angle on the filling.  
Comments:
'They were really great.  The flavour was good and I could taste the ham.  I prefer a little less creaminess but overall, I liked them. 'Bakery/deli Manager

Notes: Air Dried vs Smoked Hams 
Proscuitto and the Spanish Serrano Ham have similar levels of salt to bacon or ham but are air dried and, when produced in the traditional way, contain no nitrates. 
Proscuitto and Serrano are also lower in fat.  Comparing 3 slices of bacon to 2 of  air-dried unsmoked hams, air-dried have half the calories, half the fat and half the saturated fat. Obviously the paper-thin slices of air-dried ham contribute to its healthier profile.
Given a choice and the budget, 67 prefers Italian prosciutto but the less expensive Spanish serrano is a more than acceptable substitute, and you get more in weight for your pound.           
*Freeview 41   

Tips:
  • Vegetarian options: replace ham with sun-blush tomatoes OR just blend yolks with yoghurt mayo, salt, smoked paprika
  • Foolproof Hard-Boiled Eggs without sulphur ring.  Place eggs in a pan of water; bring to a boil; turn off heat, cover with a lid and leave for 7 minutes.  Run under cold water. 
  • If you liked this you will also like 67's Tuna Stuffed Devilled Eggs  
First courses/canapes NavBar: RecipesII (nr bottom of page)...
   
Please leave a Comment in the box below

Copyright: This recipe has been developed by B M Lee/ Bright Sun Enterprises and may not be reproduced, in any form, without the author's written permission.

FRUGAL: EGGS ENROBED IN WHITE SAUCE

Guests really love these...

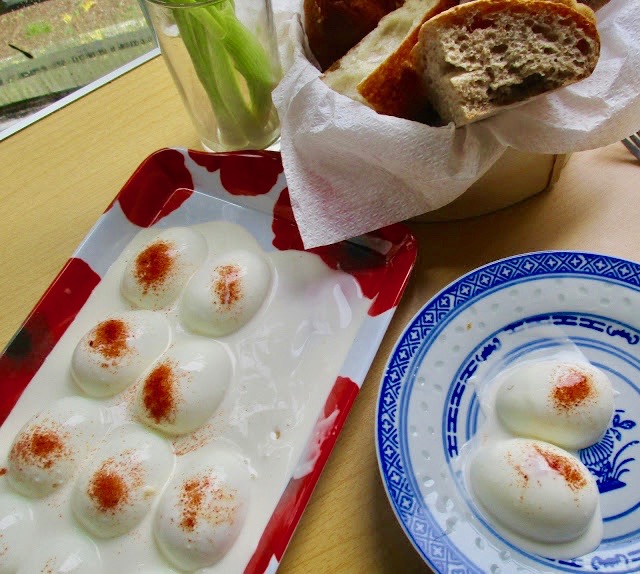
'Runny' Eggs -- frugal childhood favourite for buffets & Pot Luck entertaining

67goingon50 usually produces these delicious eggs, enrobed in delicate white sauce, for large gatherings when worried about not having enough protein to satisfy guests.  

The recipe is the simplest imaginable and takes no time to put together yet the results are always enthusiastically received. Apparently they remind the English of childhood -- charming and delightful!  These aren't suitable for eating by hand; have plenty of serviettes, plates and bread nearby.

67 first came upon these eggs in the kitchen of a private hospital.

Cost: £2.00 (8/23)
Feeds: 12 at a party; 6 as a starter, 3 as a main

Ingred:
   6 med or large eggs, free range if poss 
   1/3 cup/80 ml mayonnaise
   water
   smoked paprika 
   lettuce garnish (opt)

Method:

CHERRY ALMOND SLICES, Skinnier, A lower-sugar Indulgence

Enticing skinnier Bakewell with cherries but no pastry or jam... 
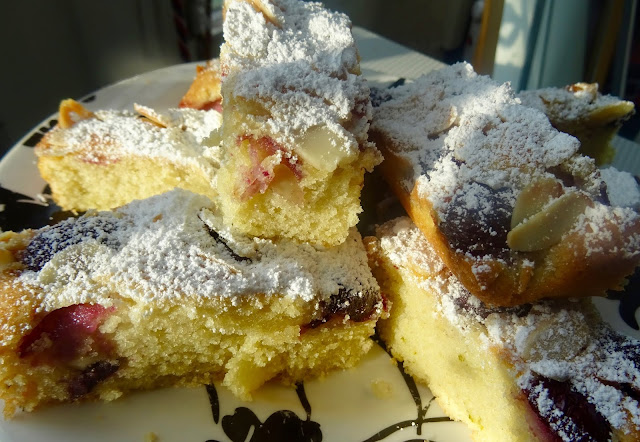
Cherry Bakewell Slices - no pastry or jam, lower fat/sugar but still tastes fab
'Absolutely gorgeous; the sweet of my dreams!' Taster

67's take on Bakewell tarts dispenses with pastry and jam and replaces raspberries with fresh fat English cherries.  

This recipe takes half the usual time to prepare, focusing on the gloriously light and fine crumbed frangipane filling.  The classic filling has been modified to produce an airy but moist cake firm enough to stand on its own.  

Classic Bakewell tarts are a delightful mix of butter, sugar, almonds, eggs, pastry and jam.  They are found everywhere in the UK, in bakeries and supermarkets, in various permutations.  

But nothing beats home-made - even if the pastry and jam are missing - and the heady scent of almonds and fruit.  Even better the best of the Bakewell is produced in half the time.

67's recipe cuts sugar and fat without affecting the beauty of the sponge. It's designed for small households, providing 10 good sized bars but multiplies easily.  

Cost: £1.75
Makes: 10, but is easily doubled.

Ingred:
   75gm/2.7oz softened butter
   75gm/2.7oz sugar
   75gm/2.7oz ground almonds
   1 egg
   1/2 tsp vanilla
   zest of one lime (or lemon)

   75gm/2.7oz plain flour
   1/2 tsp baking powder

   2 tbsp milk

   generous handful fresh cherry halves
   generous handful flaked almonds

Method:
  1. Preheat oven to 190c/170fan/375f
  2. Line a 24x13cm/9.5x5in pan or equiv (7in/17cm square or circle) with greaseproof paper
  3. Beat butter and sugar until light and pale - 2-3 mins
  4. Add ground almonds; blend
  5. Beat in egg and vanilla
  6. Stir in lime zest until well distributed
  7. Stir flour and baking powder together; add to mix; beat until just blended
  8. Add milk; blend
  9. Scrape into tin and smooth the top
  10. Press cherry halves lightly into the surface, then generously scatter flaked almonds 
  11. Bake 20-25 mins in centre of oven until brown or a toothpick inserted in the middle comes out clean
  12. Cool on a rack 10 mins, then remove from pan and cool completely
  13. Dust with icing sugar or drizzle with melted white baker's chocolate*
Comments:  
'Absolutely gorgeous; the sweet of my dreams! And I loved the cherries.' Retired writer 

Tips:
  • A generous handful of finely chopped cherries stirred through the batter will add to the slices' general cherry-ness.
  • Ground almonds are not the most frugal ingredient at £2+ for 200gr/7oz but are an important ingredient in any baker's cupboard.  Used occasionally, they take treats to another level.  They are also gluten-free.
  • Bakewell tarts originated in the picturesque Peak district of Derbyshire; they were a popular treat in Tudor times, often served to noblemen.
*Morrisons £1


More skinnier baking on NavBar/RecipesI: Baking...

PLEASE LEAVE A COMMENT IN THE BOX BELOW

This recipe has been developed by B  Lee/ Bright Sun Enterprises and may not be reproduced, in any form, without the author's written permission.

HOW TO...FOOLPROOF HARD BOILED EGGS

Tired of hard-boiled eggs with yolks turned green and sulphurous? Or trying to peel one without leaving lumps of egg white attached?   

Perfect hard boiled eggs are easy!


Perfect hard-boiled egg: creamy centre, no sulphur ring, succulent white 
  1. Start, if you can, with old eggs brought to room temperature.  Turn the carton upside down so the yolks can gravitate more to the centre.
  2. Place eggs in a pan of cold water; water should cover eggs by an inch
  3. Bring to a boil
  4. Turn off heat, cover with a lid; leave 7 minutes.  
  5. Drain; run eggs under cold water until cool to the touch; warm is ok
  6. Tap top and bottom of egg on a hard surface to crack the shell
  7. Firmly press the egg against the hard surface and roll it; the rest of the shell will crack all over
  8. Have a bowl of cool water nearby
  9. Starting at top or bottom, peel away the egg shell; it should release easily but dipping it into water may help it along
NOTES: 
Eggs are little powerhouses packed with protein, disease fighting nutrients and plenty of vitamins and minerals.  A single egg has only 75 calories but contains one of the highest forms of protein, next only to beef and cows' milk.   
Eggs are very versatile, adding a special accent when fried and dolloped on top of rice or stirred in silken strands through hot soup.  Quiches and tortilla/frittata make substantial main courses while, encased in flour/chickpea wraps or phyllo pastry, they make delightful snacks. And don't forget breakfasts. 
Best of all?  This high quality food is not expensive. 
More eggs on NavBar:RecipesI/Eggs


Please leave a comment in the box below

This information has been provided by B  Lee/ Bright Sun Enterprises  and may not be reproduced without the author's written permission.  Bright Sun accepts no liability for the consequences of any actions taken on the basis of the information provided.