Thursday 29 June 2017

HOT RASPBERRY PUDDING, Low-sugar, no-carb, 67 All-time Favourite

Exquisite English Raspberries are not just for scoffing by hand; baked in a creamy thick custard, they are to die for...
 The aroma of raspberries & custard will knock you off your feet;
 as good as it looks and smells, it tastes even better
 originally published 2015 as Russian Raspberry Pudding)

This easy-peasy knock-your-socks off indulgence is low-carb; it's lighter than clafoutis with the topping being more of a custard than a batter.  It is also very low in sugar (though it has a high dairy count) but is still a wonderful, mouth-watering dessert.  There's not much to it -- berries, cream, eggs -- and it's very easy to put together.  The final result, however,  is glorious -- creamy, studded with hot succulent fruit and smelling fabulously of berries.  Take advantage of British raspberries and enjoy!

It doesn't keep so best to eat it all up while it's warm.  It's wonderful with yoghurt cream or, if your heart can stand it, clotted cream.

The dish has been part of 67's collection for so long, its source is long forgotten.

Cost: £4
Serves: 4-6

Ingred:
   12-16 oz/ 340-500 gm raspberries
   1-2 tbsp sugar
   220 ml/1 cup + 2 tbsp soured cream (see tips)
   2 eggs
   1 tbsp flour
   1 tsp vanilla extract
   1/2 tsp cinnamon (opt)

Method:
  1. Heat oven to 300f/150c/gas 3
  2. Butter a shallow oval gratin dish
  3. Add raspberries; sprinkle with sugar to taste.  Place in oven until raspberries are hot.
  4. Beat cream, eggs and flour.  
  5. Pour over raspberries and return to oven, near the top.
  6. Bake until topping is pale brown and firm, about 45 mins
  7. Serve lightly dusted with icing sugar (opt).
Tips:  

  • For a healthier mix, replace 1/3 of the soured cream with unstrained yoghurt thinned with a bit of water
  • Substitute cherries for raspberries, using a stoning device or one end of an extended paper clip. Or halve cherries and dig out stone 

                                                                   For more fruit desserts, go to Nav Bar: Recipes...

This recipe has been developed by B M Lee/ Bright Sun Enterprises.  It may not be reproduced without the author's written permission.

FAVOURITES FROM THE ARCHIVE: EXOTIC FRUIT SALAD, lower-sugar, easy, make-ahead

Soft fruit salad with an exotic Asian twist; perfect on a hot summer night...
Exotic soft fruit salad
photo 6/8/16
Three things set this gorgeous fruit salad well apart from the run-of-the-mill.  One, all the fruit is soft, either berries or stoned fruit, and there are none of the usual apples, pears or oranges.  Two, apple juice replaces the usual high calorie sugar syrup that sweetens many fruit salads.  Three, the addition of finely diced sweet stem ginger and a tiny amount of ginger syrup adds an exotic layer of flavour. 

To take it up an extra level, add a soupcon or two of brandy or another fruit liquor for a boozy kick.  (Abstainers can go for white or red grape juice.)

Extremely easy to put together, the fruit salad should be made on the day of serving but refrigerated a few hours to allow the flavours to blend.

The salad suits every budget: be as frugal or extravagant as you please but probably three fresh fruits is the minimum. 

Cost: depends on what's put in it, say £4 for a good selection of fruit (leftover fruit can go into Black Sugar Fruit Cups or smoothies.  

Ingred:  any or all of
   1/2 cup strawberries, quartered
   1/2 cup blueberries
   1/3 cup raspberries, halved
   1/2 cup pitted cherries, halved
   1/3 cup grapes, halved if large
   1-2 kiwi fruit, skinned and sliced
   1/2 cup pineapple segments, fresh or frozen (pref), or drained tinned in juice, not syrup
   1 peach or nectarine, peeled and stoned, coarsely chopped
   a handful of fresh lychee fruits, halved, or 1/2 cup tinned, drained lychees

Then: 200 ml apple juice, organic if poss 
   1-2 globes stem ginger in small dice (from jars of ginger in syrup, most supermarkets)
   2-3 tbsps ginger syrup in the jar
   1 tsp vanilla extract or the seeds from a vanilla pod

   2-3 tbsp brandy or fruit liqueur or grape juice(opt)

Method:
  1. Place fruit in a large bowl
  2. Cover with apple juice; add syrup, vanilla & alcohol, if using
  3. Add finely diced ginger; stir gently to distribute fruit evenly
  4. Refrigerate at least 4 hours but not overnight
  5. Serve with yoghurt-cream, thick double cream or ice cream 
Tip:
If transporting in a preserving jar like the one in the picture, cover the mouth of the jar with at least two layers of clingfilm before closing lid; transport upright.

    More fruit desserts on Nav Bar: Recipes/Fruit Based Desserts...


    Please leave a Comment in the box below

    This recipe has been developed by B  Lee/ Bright Sun Enterprises and may not be reproduced, in any form, without the author's written permission.  

    Tuesday 27 June 2017

    HEALTHIER WAFFLES, Sugar&yeast-free, almost no fat, higher fibre, wheat-free option, frugal

    Waffles aren't just for breakfast; they can be snacks, tea treats, sandwiches and dessert...
    updated Nov 2022
                                                          
    Waffles with Strawberries'n Cream: 
    Low sugar & fat, with wheat-free and high-fibre options
    photo 19/6/17

    Back in 2017 when this recipe was first posted, few UK households owned a waffle-maker.  Since then, many -- attracted by well-priced models - have added a waffle iron to the household equipment.  

    And many families are now happy to indulge in this European based/iconic  American treat, especially with a recipe like this one --  low sugar and fat and with wheat-free and high fibre options.

    Households have grown to really love waffles; the possibilities for waffle treats all day are endless:
    • waffles for breakfast with maple syrup, sweet bacon & sausages
    • portable waffle sandwiches stuffed with cooked meat, pickle & cheese 
    • chocolate chip 'cookie' waffle
    • peanut butter & banana snack waffle
    • afternoon tea waffles with berries & cream 
    • home-made waffles frozen and reheated in a toaster (a great healthy no-sugar carb for a kid's breakfast)
    • waffles stuffed with crispy Southern Unfried Chicken
    ...and waffle-shaped panini, pizza, hash browns & omelettes.  

    67's favourite is the breakfast waffle but a close second is the tea-time treat, waffles with fruit and cream (or if you're not indulging) thick unsweetened yoghurt with vanilla.

    The Strawberries 'n Cream waffle, pictured above, is indulgent but pretty low on the OMG-scare-o-meter.  The batter has no sugar and only a little fat.  Replacing some of the flour with wholemeal adds healthy fibre.  If the fruit is ripe and sweet, no sugar is needed. If you want to be really good, don't bother with the cream, just go with strained unsweetened vanilla yoghurt. (See how to do it at home, bottom of page Dressings)


    Cost: £2.50 (2022)
    Feeds: 8-10 single waffles  (recipe doubles easily)

    Ingred:


        100gm/3 1/2oz plain white flour
         50gm/1.7oz wholemeal flour
            2 tsp baking powder
            pinch salt

         1 egg, separated
         300 ml milk
         2 tbsp light veg oil (or melted butter)
         1/2 tsp vanilla extract         


    Method:
    Separate egg yolk and egg white; set white aside in a clean bowl; place yolk in a jug
    1. Sift dry ingred into a large bowl - the bran will be left behind but just toss it in on top of the flours; mix; make a depression in the centre
    2. Add milk to the yolk, then oil & vanilla; stir together; pour into dry ingred
    3. Using a whisk & plenty of muscle, beat until smooth and thick  
    4. Whisk egg white until soft peaks form (electric beaters are fine for this)
      Soft Peak
      Courtesy of Fine Cooking and licensed for 
      reuse under this Creative Commons Licence


       -when you lift the beaters the whites form a peak that folds back on itse
    5. Preheat waffle iron until 'ready' light goes on
    6. Fold the egg whites into the batter using a spatula to cut the white into the mix by pushing it down to the bottom and back up again, turning the bowl as you go, until the whites are incorporated.  (A few streaks are ok.)
    7. Using a silicone brush dipped in oil or butter, lightly brush the waffle wells 
    8. Fill each waffle well 2/3 full, gently pushing the batter into the corners 
    9. Close waffle iron; do not open until done.  It  will take 5-10 mins or until (a) the machine stops steaming or (b) the thermostat turns off.  
    10. Release waffles with tongs or a blunt knife slipped under a corner; the waffles should should come away easily
    11. Pile on sliced fresh strawberries and top with:
    • clotted cream (indulgence) OR
    • whipping cream mixed with strained unsweetened 0-fat yoghurt flavoured with vanilla or lemon zest (a 'skinnier' treat) OR 
    • strained unsweetened 0-fat yoghurt flavoured with vanilla or lemon zest ('I just want something sweet & creamy without breaking my diet!')
    14.  If freezing waffles or saving for later, cook, cool completely, place in an air-tight bag with small strips of greaseproof paper in between; refrigerate up to 3 days or freeze.  Defrost overnight and lightly toast before serving.
    For information on freezing & reheating waffles, plus cleaning the waffle maker,  see How to...Waffles: everything you wanted to know

    Tips:
    • if you don't have a waffle iron, do a Jaimie Oliver and cook them in a well-greased grill pan, following the same instructions in Method: 8-10 
    • Separating the egg and folding in the beaten whites is essential if you want the best waffles - uniformly thick, fluffy inside and beautifully crunchy outside.  But if you can't be bothered and just want to mix a whole egg with the milk, you'll still get good waffles
    • The recipe works well with spelt flour instead of wheat
     Waffles & quick breads incl, pancakes on NavBar: Recipes I/Baked Goods 

    Please leave a Comment in the box below


    This recipe has  been developed by B M Lee/ Bright Sun Enterprises.  It may not be reproduced without the author's written permission.  

    HOW TO...WAFFLES: EVERYTHING YOU WANTED TO KNOW

    Waffles: Questions, Answers and History


    Classic Waffles with Maple Syrup Courtesy of Pexels Unsplash.com  and licensed for reuse under this Creative Commons Licence

    Are Waffles Healthy?

    If not smothered in butter and maple syrup, waffles can be healthier than other baked treats.  For a start, there's little fat and only a small amount of sugar. 67's waffles have 2/3 white flour and 1/3 wholemeal; they are served heaped with fresh, sweet fruit like strawberries and a small amount of double or clotted cream.  Replace the cream with thick unsweeted sugar-free yoghurt flavoured with extract of vanilla or orange and that's a healthy treat.

    Some recipes don't beat the egg whites separately

    Folding in beaten egg whites makes wonderful mind-blowing waffles -- uniformly thick with a fluffy interior and crisp exterior -- and is strongly recommended.  That said, if you haven't the time or energy, a standard egg-milk mix still produces good waffles.  

    How do I know the waffle iron is ready?

    Most modern waffle makers have a green light indicating the machine is ready.  But a simple test is to sprinkle a few drops of water on the plates; if they sizzle and dance around for 2-3 seconds before disappearing, the machine is ready.  If the drops linger longer, the plate needs to heat for longer; if the drops disappear immediately, the plates are too hot.


    Overfilling the waffle wells may lead to leakage


    Sometimes the batter leaks out. Why?

    Overfilling the waffle well will do this.  It's important to work out how much waffle mix to put into each well.  With the Giles Posner it's 1/4 cup exactly to fill it to the recommended 2/3 full; the waffles come out a uniform thickness,  beautifully shaped with no holes or lacey edges (though holes/lacey edges are not a bad thing).  Other machines will be different; you'll need to do some tests.


    How do I know the waffles are cooked?

    When the waffle machine is closed, it emits steam as the batter cooks; it can be seen coming off the waffle maker.  When it stops, the waffles are ready.  Another clue is if the thermostat light turns off.  The usual recommendation is 5-10 minutes.  (The Giles Posner waffles were ready in 6 minutes )

    What do I do with leftovers? 

    Waffles will be okay for three days, if well wrapped in clingfilm and refrigerated or stored in an air-tight container.

    They also freeze well.  Line a baking tray with greaseproof paper and lay out waffles with a little space in between; freeze 6 hours or overnight; move to an air-tight container & return to freezer for use as and when

    What is the best way of re-heating waffles?
    1. Place on a baking rack on a baking tray; bake in pre-heated oven 350F/180c, 10-15 mins; keep an eye out - they burn easily.  If frozen, defrost overnight.  OR 
    2. Cook from frozen in the toaster; this is a brilliant way of getting no-sugar, low-fat, good fibre carb breakfasts into kids.

    Waffles with Fresh Fruit & Yoghurt
    Courtesy of Pexels Unsplash.com 
     and licensed for reuse under this Creative Commons Licence

    Should I cook waffles I intend too freeze for a shorter period?

    Undercooking waffle batter runs the risk of having an uncooked middle; overcooking them could result in burnt waffle if you put them in a toaster.  67  found waffles intended for the freezer and toaster will be perfect if one minute is lopped off the cooking time.  If re-heating in an oven, proceed as normal. 

    How do I clean the waffle maker?

    Clean after every use.

    Unplug from power supply, allow to cool.
    Wipe with soft damp cloth; dry thoroughly.
    If food is baked on, apply small amount of warm water & mild detergent then wipe clean with paper towel.

    Do not: immerse waffle maker in liquid of any kind
                use harsh or abrasive cleansers/scourers   

    HISTORY

    It's said that waffles came about when an armoured knight sat down on pancake batter and created its distinctive grid shape.


    Cast Iron Waffle Iron from the 1800's
     Courtesy of Pinterest  and licensed for reuse under this Creative Commons Licence

    It's a colourful fable but in fact, the true history of the waffle is much more interesting.  

    Food historians say waffles first appeared in ancient Greece when cooks roasted flat cakes between 2 metal plates attached to a long wooden handle.

    By Medieval times the Catholic church was producing large unleavened wafers showing Biblical scenes and crosses; in the community, the design evolved to family crests and landscapes.

    By the time of the Crusades, which brought spices and sweets to the dining table, the batter became thicker and softer, and the irons, deeper.

    15th century Belgium began to produce rectangular plates and the now-familiar grid pattern -- some say as a cost-cutting measure to cook less batter over a greater surface.

    Whatever, waffles took Belgium by storm and over the next 200 years the country produced many varieties.  Waffles were taken with tea and chocolate in the afternoon in the tiny country but the rest of Europe developed its own versions.  Germany had coffee flavoured waffles; French waffles - part of a roaring trade in street stalls - were enhanced with cloves, Spanish wine and lemon zest.  In America, colonists - thanks to Thomas Jefferson falling in love   with waffles during his sojourn in France - were throwing waffle parties known as 'waffle frolics.'  (The mind boggles!).


     American Waffles with Maple Syrup
    Google Stock Image

    The 1958 World Fair made the Belgian waffle world famous but over the next 30 years, Americans cemented its fame.  It was the Americans who linked waffles with breakfast, serving them with maple syrup, sweet bacon and sausages.  And it was the American south which immortalised the savoury waffle, serving them with a filling of crisply fried chicken or smothered in chicken stew.


    In the UK, US-style waffles suddenly became fashionable a few years ago in up-market eateries.   Before then, waffles were linked with Ireland, as another manifestation of potato pancakes.  Cooked and raw potatoes produced a half pancake, half hash-brown hybrid. Frozen mass-produced potato waffles are apparently still highly popular in Irish households. 


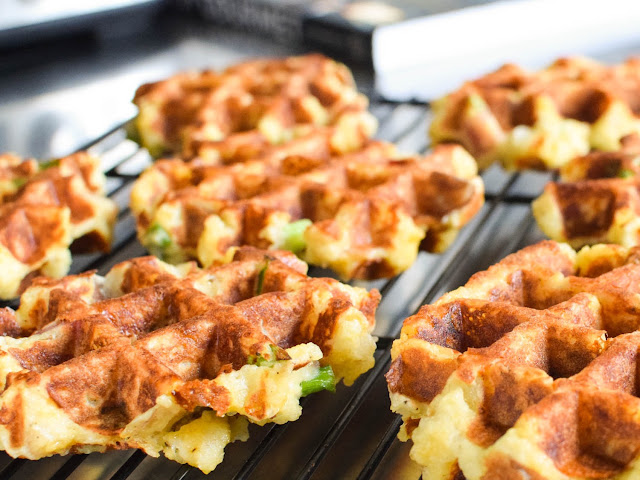
    Irish Potato Waffles with Bacon & Spring Onion 

    Sources:
    http://mentalfloss.com/article/78997/wafel-wafers-belgian-breakfasts-brief-history-waffles
    http://www.wikihow.com/Make-Waffles
    http://www.goodlifeeats.com/how-to-freeze-and-reheat-pancakes-and-waffles/


    B Lee/Bright Sun Enterprises accept no liability for the consequences of any actions taken on the basis of the information provided.

    Tuesday 20 June 2017

    HOW TO...MAKE MINCE BY HAND

    A useful technique if we ever lose electricity...
    Meat minced by hand: look closely and you can see chicken, pork & bacon


    Back in the day when kitchens did not have food processors and blenders,  cooks often made their own mince.

    Sure, it was a bit of a faff.  

    But the simple technique of bashing fillets of meat and then chopping them -- over and over again -- was very effective.  And believe me, you have not lived until you have seen a Chinese chef mincing meat with a cleaver in each hand.

    Chinese Cleaver, Chinatown supermarkets
    prices according to choice

    A Chinese cleaver or any other solid knife with a good sharp blade (say, a cook's knife) is essential but basically it's pretty low tech.  Arm muscles will be given a good workout that may help banish bingo wings.  

    Mincing your own meat makes the best Coarse Country Terrine but is also useful if you don't have a food processor or blender. 

    Note:  This technique is not suitable for cooks with a low level of knife skills or lacking in confidence in the kitchen.  First:
    • remove any children from the kitchen 
    • have a well-stocked First Aid Kit nearby
    (Instead, if you can, coarsely mince the meat in a food processor)

    ****

    1.  Remove any tough sinews from the meat ; slice into thick fillets; cover with cling film and bash with a rolling pin or meat mallet. Remove cling film. 

     (The photos show chicken thighs)


    2.  Hold the knife/cleaver firmly by the handle and slam it, sharp side down into the meat, in repeated closely spaced strikes; the meat will take on a striped appearance


    3.  Continue chopping the meat, moving the blade in different directions until the meat begins to take on a mince-like texture.  


    4. Mentally divide the meat in half and fold the right side over the left.  Continue chopping and folding until the meat takes on the desired consistency.


    B Lee/Bright Sun Enterprises accept no liability for the consequences of any actions taken on the basis of the information provided.

    SMOOTHIE FOR STOMACH UPSETS, medicinal, no added sugar, vegan

    Having a dicky tummy whatever the time of year is no joke...
    3-ingredient Smoothie that soothes summer stomach upsets
    'This tasted really good and the ginger helped my stomach settle within an hour.' Taster

    ...here's something that will help.

    Hot weather/seasonal festivities can lead to stomach ailments of various intensity.  

    According to the NHS, common symptoms are:
    • feeling sick to the stomach
    • stomach cramps
    • tummy pain
    • lack of energy & weakness
    • low or no appetite
    • fever
    and in worst cases:
    • vomiting
    • diarrhoea
    The most important treatment is to drink plenty of liquids but also:
    • don't eat until you feel up to it and stick to small non-fatty meals
    • bland foods like toast, crackers, rice & bananas are good choices
    • avoid alcohol, caffeine, fizzy drinks & spicy and fatty foods
    • if things haven't improved within 3 days, see your doctor
    In the early stages of stomach discomfort, this smoothie is perfect.  It is also an ideal remedy during a heatwave: it's liquid, tasty, naturally sweet, soothing and refreshingly cold.  

    Cost: pennies
    Serve: 1

    Ingred: 
        2 generous handfuls frozen strawberries
        1 ripe banana, peeled
        1/2-1 tablespoon grated peeled fresh ginger 
        1/2 cup water

    Method:
    Blend in a smoothie maker or food processor; add a slice or 2 of banana for garnish.
                                                  More smoothies, on Nav Bar: Recipes I/Drinks...

    Please leave a Comment in the box below

    This recipe has been developed by B M Lee/ Bright Sun Enterprises.  It may not be reproduced without the author's written permission. 

    3-MINUTE ASPARAGUS, PEA & CORN SALAD, almost no cooking, Hot Weather Dishes

    Barely any cooking; perfect for the busy cook...
    Quick & easy concoction of fresh & frozen veg in a cool creamy sauce
    This simple salad is a doddle to prepare and is ready almost instantly -- a boon in a heatwave or on a festive occasion.

    It has a base of frozen peas, packaged corn niblets and raw mushrooms.   A few thin spears of asparagus add a luxurious touch without busting the budget.  The frugal can substitute green beans. 

    It's a lovely combo exactly as it is; adding other ingredients, whether raw or crisply cooked, isn't recommended - they will mask the lovely taste & texture of English asparagus. 

    Cost: £1.50
    Feeds: 2-3

    Ingred:
       1/2 cup corn niblets
       1/2 cup frozen peas
       6 asparagus spears, cut into 4 pieces each

       1/2 cup raw mushrooms in small dice
       2 tablespoons pine nuts or sunflower seeds

    Dressing   
       1 1/2 tbsp 0-fat plain dairy or plant yoghurt
       1 1/2 tbsp mayonnaise
       1 tsp balsamic vinegar
       pepper & a little salt

    Method:
    1. Hold each asparagus spear at each end; bend until it snaps - usually about 2/3 - 3/4 of the way down. Discard the bottom bit and cut the rest into four pieces.
    2. Bring a small pan of water to the boil; add corn, peas & asparagus; cook 2 mins only, drain and plunge into a bowl of ice water; drain
    3. Mix with mushrooms & nuts/seeds
    4. Add dressing
    5. Chill a few hours to allow flavours to blend
    Salads on NavBar:RecipesII

    Please leave a comment in the box below


    This recipe has been developed by B M Lee/ Bright Sun Enterprises.  It may not be reproduced without the author's written permission. 

    LOWER-FAT COARSE COUNTRY TERRINE, a perfect dish for a picnic

    Marvellous more-ish Country Terinne, thrillingly chunky but low in fat...
                                          
    Lower-fat Chunky Country Terrine with challah bun and picallili
    'Mmm; Mmm! ' 'Love the pistachios (not in photo) and hint of orange' 'The gherkins were inspired' (Tasters)

    67 loves a good country terrine, coarse in texture, studded with nuts and chunky with strips of chicken and/or ham.  But mainly due to the presence of fatty pork shoulder and belly, plus lashings of streaky bacon, terrines and pates have been off the 67 menu for some time. 

    Until now.  67 has adapted a recipe from the Hairy Bikers that - with judicious substitutions - offers a multi-textured terrine that's lower in fat but still with mouthwatering flavour and texture.  

    Chicken/turkey replaced pork shoulder; pork cheeks (very cheap) and pork fillet (not so cheap) were substituted for pork belly; back bacon shorn of fat replaced streaky bacon. Smoked ham hock cooked till meltingly tender was incorporated into the terrine to add flavour.  The result is less in-your-face but wonderfully tasty all the same.  And so appetising.  


    Terrine Platter
    with Devilled Eggs & Aubergine Pate

    The terrine, for special occasions, is a financial indulgence.  The cost was over £10 but it will feed many people if the terrine is sliced thickly and halved.  A similar shop-bought terrine would cost a great deal more.  

    Given the amount of alcohol involved, pate is said to last up to a month in the fridge but 67 wouldn't chance it more than 3-4 days.    

    This isn't an easy-peasy recipe - it takes a fair few steps and some time to prepare - but much of the time is resting time and the method is - apart from hand mincing some of the meat - fairly straight forward.   

    If you prefer a smoother pate, use a food processor or blender for the meat mix but do include the strips of chicken, ham & gherkins/pickles & pistachios.  

    Prepare at least a day before needed; the flavours deepen overnight.  

    Cost: £10'ish
    Feeds: 24 as an appetiser

    Thursday 15 June 2017

    FOOD FOR FATHERS' DAY: BEEF KOREAN STYLE WITH SESAME ASIAN NOODLES, Wallet-friendly, Make-ahead

    Heat with a hint of sweetness:  sensational outdoors or in, city or country...
    Korean Style Beef Slices, spicy, sweet & tender
    'This excellent beef with Sesame Noodles made a darned good meal!'  Taster 
     2/8/16
    This recipe is an ideal dish for Fathers Day -- it's quick and easy, partly prepared ahead of time and when the weather is good, a show-stopper.  

    It's a westernised version of a spicy-sweet Korean recipe, inspired by Bon Appetit magazine, made with ingredients found in most kitchen cupboards. 

    The marinade works with every budget.  It can be used with pork loin or shoulder, sirloin, hanger steak, beef short ribs and all cuts of chicken.

    67 went with beef short ribs, a cheaper cut (about £7/kilo, 2017) which usually needs long, slow cooking to tenderise.  Short ribs also release a great deal of fat when cooked.  Would the recipe overcome these challenges?    


    Definitely yes. The meat is sliced very thin, marinaded overnight and cooked very fast.  The result was exceptional; meat with substance  -- in a good way -- and wonderful flavour.  The pear's natural sweetness enhanced the savouriness and heat of the marinade. 


    The meat did, however, release quite a bit of fat when cooked; draining it in a colander allows most of the excess to drip away. 
    Sesame Noodles with Korean Beef

    It's perfect teamed with Spicy Sesame Noodle Salad and Asian Soft Fruit Salad , both prepared in advance.  


    Cost: £4.00
    Feeds: 2-3 but multiples easily

    Ingred:
       8-12 oz/225-340 gm beef short ribs, bones & fat removed & cut into fillets (or  more tender cuts of steak) 
       
    marinade:
        1 small pear, peeled & grated   
        1 garlic clove, minced or grated
        2 tbsp reduced-salt soy sauce
        1/2-1 tsp red pepper flakes
        1-3 shots tabasco sauce (opt)
        1/2-1 tbsp brown sugar
        1 tbsp toasted sesame oil

        1-2 tbsp ground nut or other light vegetable oil


    Method:

    1. Place beef fillets in freezer for an hour or two
    2. Mix marinade ingredients thoroughly, cover & set aside
    3. When meat is frozen enough to cut thinly, slice across the grain with a very sharp knife (*every kitchen should have a first aid kit with extra-large band-aids)
    4. Add meat slices to marinade, mix thoroughly
    5. Pour beef & marinade into a sealable plastic bag; smoosh the meat & marinade together until the meat is well coated
    6. Leave at room temperature 30 mins or refrigerate overnight
    7. When ready to cook, heat a large frying pan on med-high; when hot, add a tablespoon oil 
    8. Add half the meat in one layer; leave a minute or 2 to get a good crust
    9. Turn; leave a minute; stir another 2 mins until edges crisp up 
    10. Drain, set aside and keep warm 
    11. Cook the rest of the meat and drain; mound the meat on a platter lined with leaves
    12. Sprinkle with finely chopped green onions, green part only.   
    Comments:
    'I only get to eat beef occasionally and loved this so much I was ready to barter for more.  The combo of heat and sweetness was sublime; the meat slices were both robust and tender.  Delightful!'  70+ taster

    Tips:
    • the meat is lovely warm but is also excellent at room temperature, on a picnic 
    • the recipe doubles easily

    Please leave a comment in the box below
             .

    This recipe has  been developed by B M Lee/ Bright Sun Enterprises.  It may not be reproduced without the author's written permission.

    FATHERS' DAY: LEMON MERINGUE PIE WITH A DOUBLE SURPRISE, make ahead

    The perfect Dad's dessert
    Lemon Meringue Pie with a Double Surprise  (using ready made tart shells)
    ' Amazing; all round perfect!  Loved the raspberry addition.'  20+ tasters (photo june 2016)

    Lemon Meringue Pie is another of those once-a-year 'bloke' treats hauled out on special occasions.

    Forget about healthy -- this one is a definite Indulgence.  The only way to exert dietary discipline is to practice portion control. Good luck with that.

    For the cook, this recipe is a blessing.  Everything but the meringue can be prepared in advance.  The lemon curd filling, using a simple no-fuss recipe, can be made up to 5 days ahead and refrigerated. If you must, buy a good thick curd instead, but once you try home-made, you'll never go back.  

    Ready made pastry instead of homemade will save time; bought in pastry  shells can be prepped on the day.  Homemade can be made the day before needed and wrapped well.  But the meringue should be made and the pie constructed on the day.

    Lemon Meringue tartlets 
    The Blogger planned to use Easy-Peasy Pastry but for various reasons wasn't able to.  Ready-made sweet pastry tarts from M&S and Waitrose were tested instead -- about £2.50 for one large or 6 medium.  The thickness of the ready-made tarts was a little worrying but, in this recipe, they made an excellent base for the layers of filling.  Few will guess they were not made with the cook's fine fair hands.

    Whether homemade or bought in, the tarts should be brushed with melted chocolate (use a pastry brush) to avoid the dreaded soggy bottom. 

    If cooking for a crowd, this can be made in a rectangular tin with supermarket all-butter shortcrust pastry.  Once cool, cut in medium to small squares.

    Cost: £3 for home-made; about £5?? for store-bought pastry and curd  
    Feeds: 6-8 round; many more in squares

    Ingred:

       1 large baked pastry shell, or 6-8 smaller ones, with the bottoms and lower sides brushed with melted chocolate and allowed to set (the chocolate needs to be well melted, until it flows easily)
       50-65gm/1.75-2.3oz 70% dark chocolate, melted
        
       Lemon Curd Filling:
         2 oz/60gm butter, at room temperature 
        2 1/2-3 oz/70-90 gm sugar 
        2 large eggs plus 3 egg yolks  ( extra yolks are optional but make the curd wonderfully rich. Save whites for meringue.)  
       1/2 tsp vanilla extract 

          juice (no zest) of 2 lemons

       Meringue:
           2-3 egg whites
           2 1/2-4 oz/110gm sugar

      1 punnet fresh raspberries 
      
    Method:

    Lemon Filling (prep up to 5 days ahead)
    1. Bring a medium saucepan of water to the boil; reduce heat to a simmer; have ready a heatproof bowl that fits on top but does not touch the water  
    2. Beat butter and sugar together until light, pale & fluffy - it will take a few mins 
    3. Add eggs and yolks (if using); beat till blended
    4. Add vanilla; beat
    5. Add lemon zest and juice; blend thoroughly -- it will look ghastly and curdled but will turn silky smooth later 
    6. Pour into the bowl; place over boiling water in saucepan 
    7. Stir constantly with a whisk (don't leave it!); after a few minutes the mix will begin to thicken
    8. As you meet more resistance, poke the back of a wooden spoon into the curd; when the curd coats the spoon and your finger leaves a trail through it, it is done
    9. Pour through a fine mesh sieve (removing any bits of egg or impurities) into a clean dish; cover surface completely with clingfilm to prevent a skin forming
    10. Leave for an hour; refrigerate
    11. It lasts 5 days 
    Pastry case/s: (can be done the day before)
    1. Melt chocolate in a heatproof bowl over simmering water until completely melted
    2. Generously brush base and sides with melted chocolate.
    3. Allow to cool; chocolate will solidify
    4. If preparing in advance, wrap well in cling film; store in a cool place
    Meringue (prepare on the day)  
    1. In a clean bowl, beat egg whites to soft peaks (the tops will be floppy)
    2. Add sugar, one teaspoon at a time, continuing to beat until sugar is used up and the meringue is stiff and glossy
    Constructing the pie (on the day):
    1. Pre-heat oven to 350f/180c/gas4
    2. Line chocolate covered base with halved raspberries 
    3. Spoon or pipe over the lemon curd; level with spatula
    4. Pile meringue on top, right to the edges; swirl attractively
    5. Bake 15 mins or until meringue is crisp and golden (check after 10 mins)  
    Tips:
    • instead of making one large pie, make tartlets
    • if there are leftovers; they still taste great the following day    
            More desserts on NavBar: Recipes II (bottom page)

     Please leave Comment in the box below 

    This recipe  has been developed by B  Lee/ Bright Sun Enterprises and may not be reproduced, in any form, without the author's written permission.